

A comprehensive, step-by-step, visual guide to help you get started on mining VertCoin and Unitus! Before we start - note that this guide will explain how to merge-mine both coins, where you will receive the additional UIS at no extra cost!
How to mine VTC and UIS on Easy Mine
Generate BAT file
With the form below you can generate the BAT file for your miner, which you'll need to start it. If you add this file to the folder that contains the CCminer then you're ready to start mining. The top field takes your Miner's address and the second field (optionally) a worker name. Pressing "Download BAT" will initiate a download of the file itself, additionally it will put the content of this BAT in the text field below. Incase you want to create your own BAT file.
Table of Contents
- Step 1 - Preparing the wallets
- Step 2 - Setting up your Miner
Before you can start your mining adventure, you’ll need to download some wallets. These will allow you to access your currencies when you’ve mined them. We’ll need two wallets: One for Vertcoin and one for Unitus.
Step 1A - Vertcoin wallet
There are several options available here: Vertcoin Core, Electrum-VTC or Nano Ledger S. This guide will focus on the official Vertcoin Core wallet. The process for other wallets should be similar.
If you really want to, it is possible to directly mine to an exchange deposit address. However, do realize that this does NOT allow you to sign messages (we’ll need this to claim our Unitus and modify payout thresholds). Another important point is that some exchanges change the deposit address, which will mean that you won’t receive your VTC payout! Therefore, mining directly to an exchange is NOT RECOMMENDED.
Point of note here: Easy Mine supports legacy, segwit and bech32 addresses. However, legacy addresses (starting with V) are recommended as these are currently the only type able to sign messages.
The Vertcoin Core wallet can be found here. After downloading the wallet for your operating system, you can start the installation process.
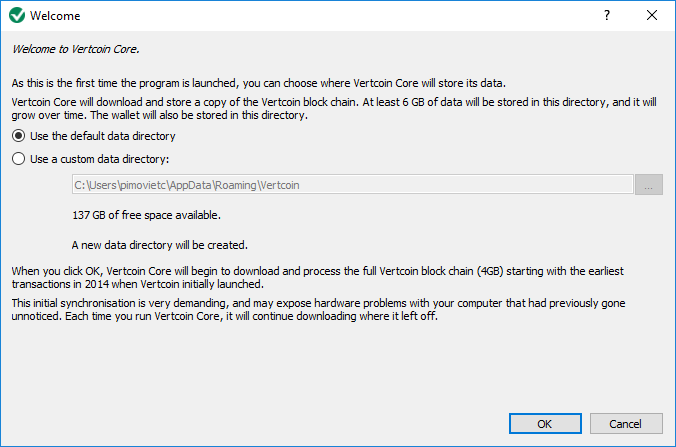
The first time you launch the Vertcoin Core wallet, you may choose where the data is stored. By default, this is at %appdata%\Vertcoin
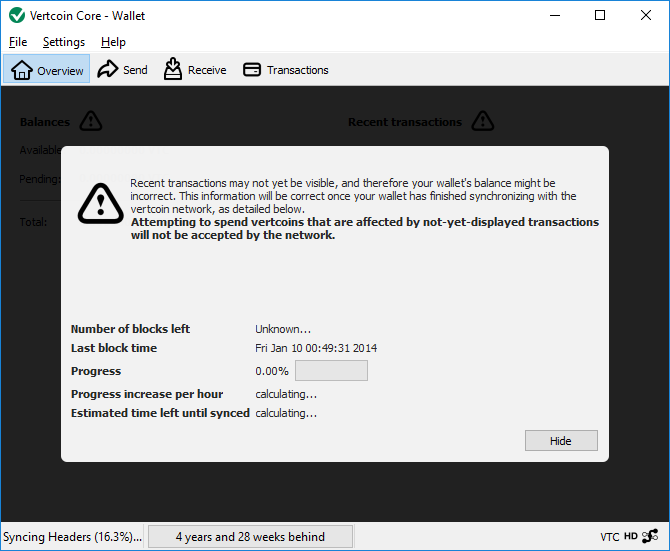
Next up - The wallet will start to synchronize with the network. This will take a long time to finish. Therefore, I’d recommend leaving it synchronizing overnight. However, it is possible to continue while it is synchronizing.
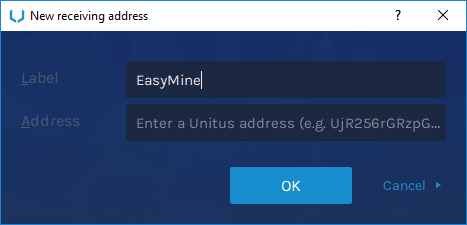
Currently, we need to do some debug-console magic to generate a legacy address, so this step might be simplified at the time you’re reading this guide. Go to help>Debug Window
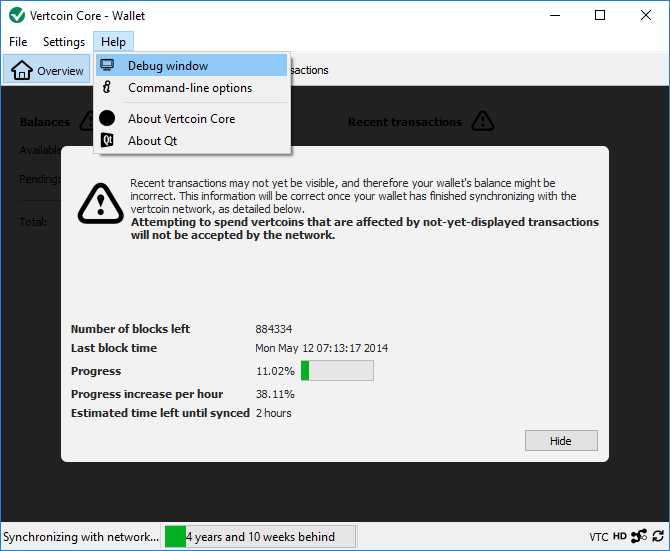
Then paste the following line at the console input (at the bottom) and press enter. The newly generated address will appear on screen and can be found in the next step.
getnewaddress "EasyMine" legacy
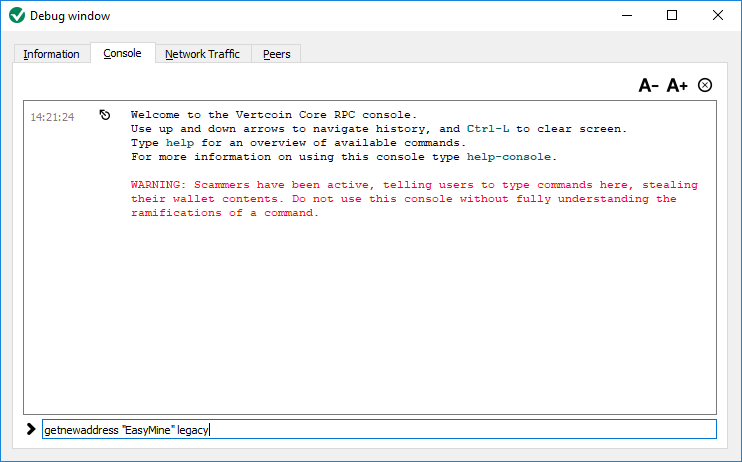
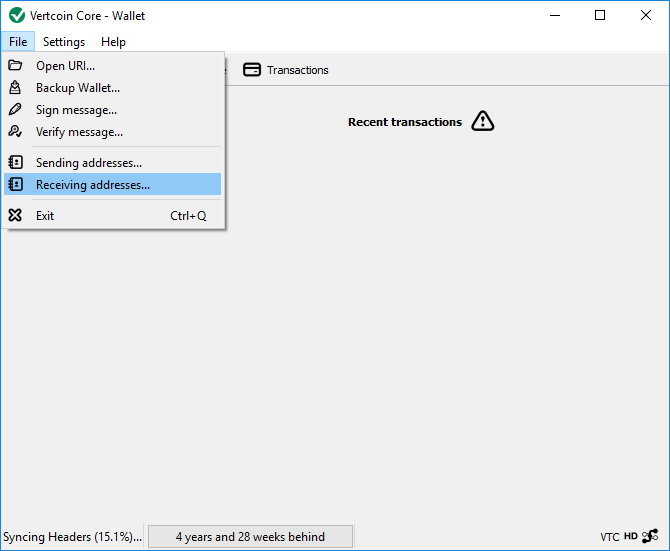
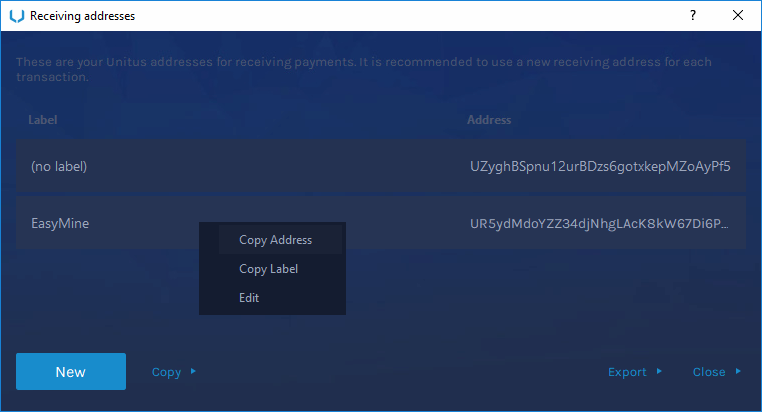
If you go to File>Receiving addresses… you’ll be presented with a screen with your newly created legacy address. This is the address we’ll be needing to mine on EasyMine. The address should start with a capital V and is a randomized string of 34 characters, e.g. VgT29UCrpQyJphre4LztiU1qf1cAaA4RNG
That wraps it up for the Vertcoin wallet, on to the next step!
Step 1B - Unitus wallet
The Unitus Wallet can be found here. After downloading the wallet for your operating system, you can start the installation process.
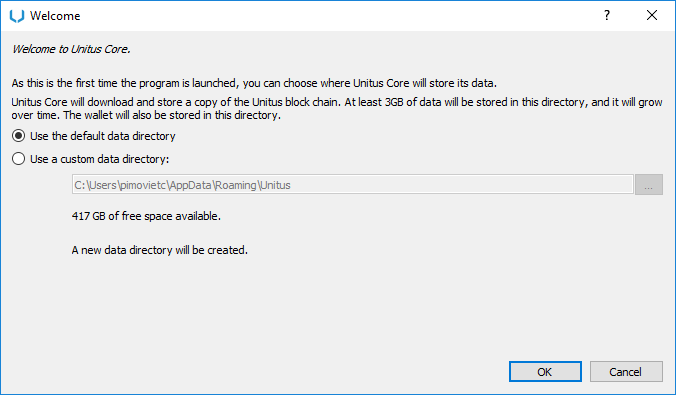
The first time you launch the Unitus wallet, you may choose where the data is stored. By default, this is at %appdata%\Unitus
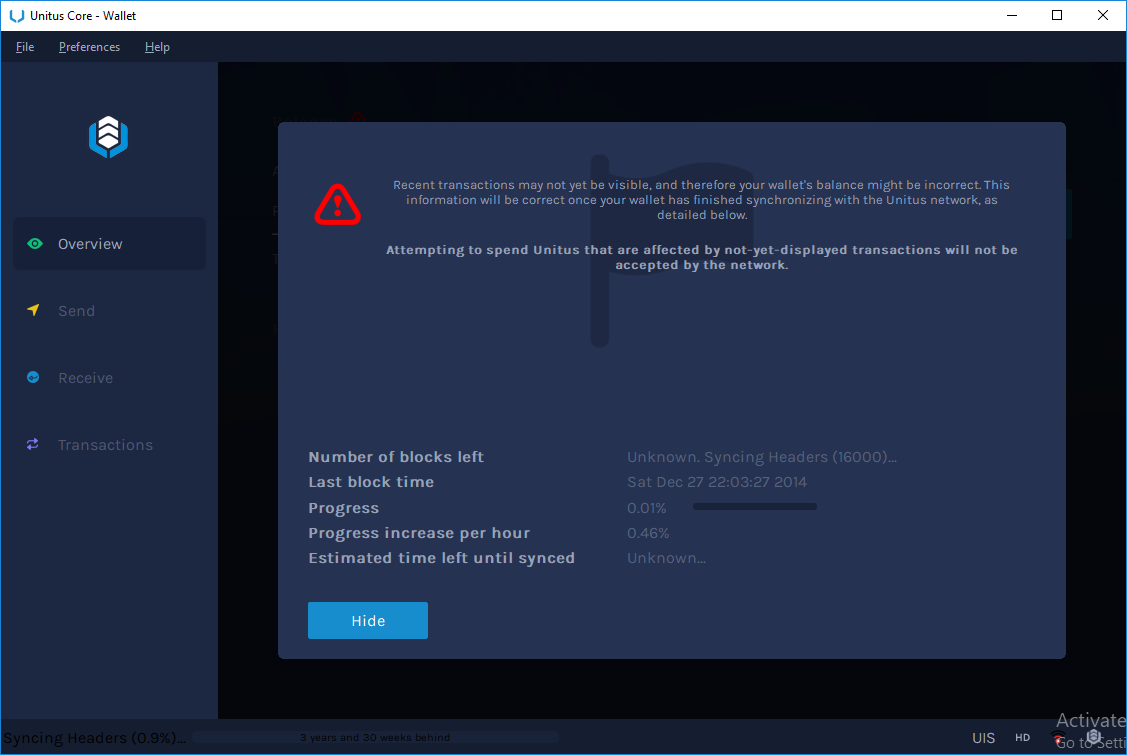
Next up - The wallet will start to synchronize with the network. This will take a long time to finish. Therefore, I’d recommend leaving it synchronizing overnight. However, it is possible to continue while it is synchronizing.
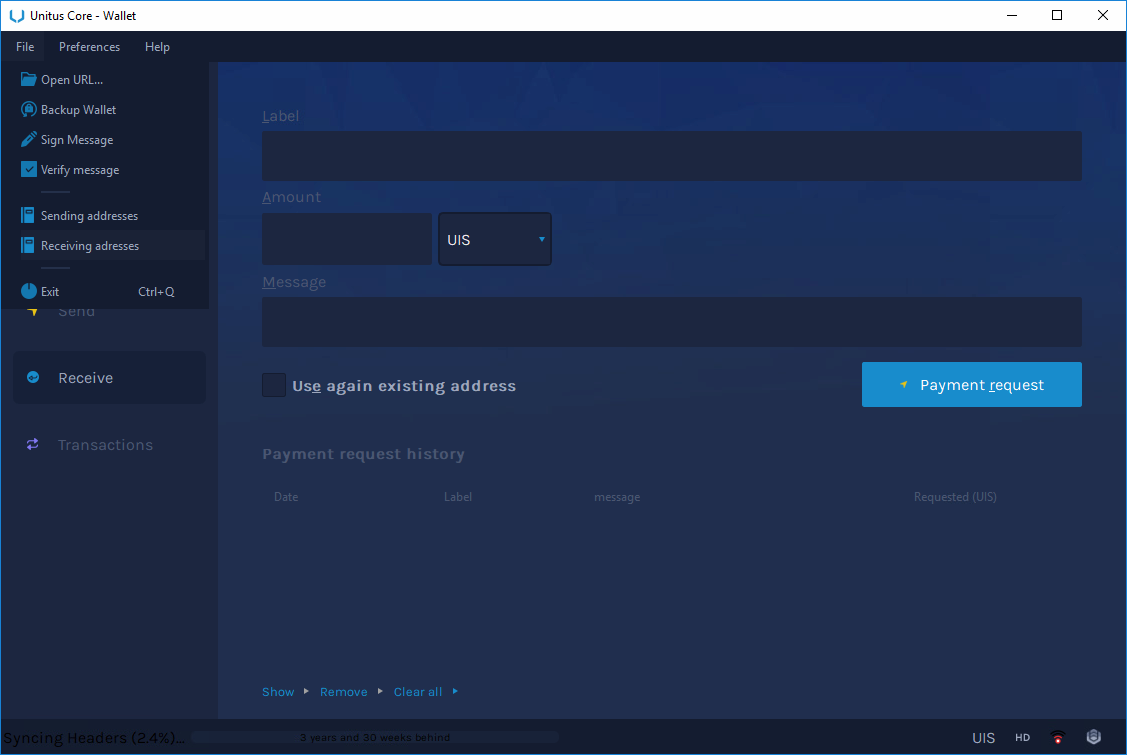
If you go to File>Receiving addresses… you’ll be able to generate a new UIS address.
Give it a fancy name like “EasyMine” and press ok. The wallet will then generate an address.
Lastly, you may copy the address and save it for use later. We’ll be needing this address when we’re linking it to our miner! The address will be a string of 34 characters starting with a capital U, e.g. Ui67Stxp5ZumXtJYgB8P465vn6Gm4asunu
That wraps up the wallet set ups, and now we can start working on our miner!
Back to topTo mine Vertcoin, we’ll need a mining tool that uses the Lyra2rev2 algorithm. Depending on what type of GPU you have you’ll have to acquire different software.
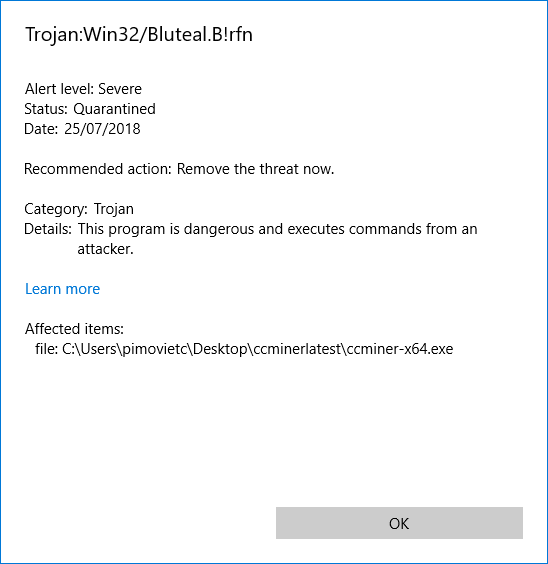
Sometimes Anti-Virus will falsely flag mining software as viruses. I can assure you these usually aren’t actual viruses. If the source you’re downloading from is legitimate (e.g. from the original github repros) then there is not much to worry about. However, if you don’t want to risk it, you can go to Step 2B which uses an older version of CCminer which doesn’t get flagged by Windows Defender as a virus. Over at the Github repo, you can inspect the changes between the latest and the “virus-free” version to see that there is no suspicious code added, indicating that Windows Defender is calling a false-positive on the software.
Step 2A - CCminer for Nvidia - Latest release
For this tutorial, we’ll be using the ccminer by tpruvot (which is a continuation from the original ccminer by cbuchner). You’ll be able to find the most recent release over at https://github.com/tpruvot/ccminer/releases. Note that there might be some differences between the most recent version and the version used in this guide. At the time of writing, this guide's most recent release is v2.3.
Step 2A.1 - Temporarily disable Windows Defender and add CCminer to the Exceptions
If you’re using a different Anti-Virus than Windows Defender, then the steps themselves will be different, but the idea of adding the files to the exception list is the same.
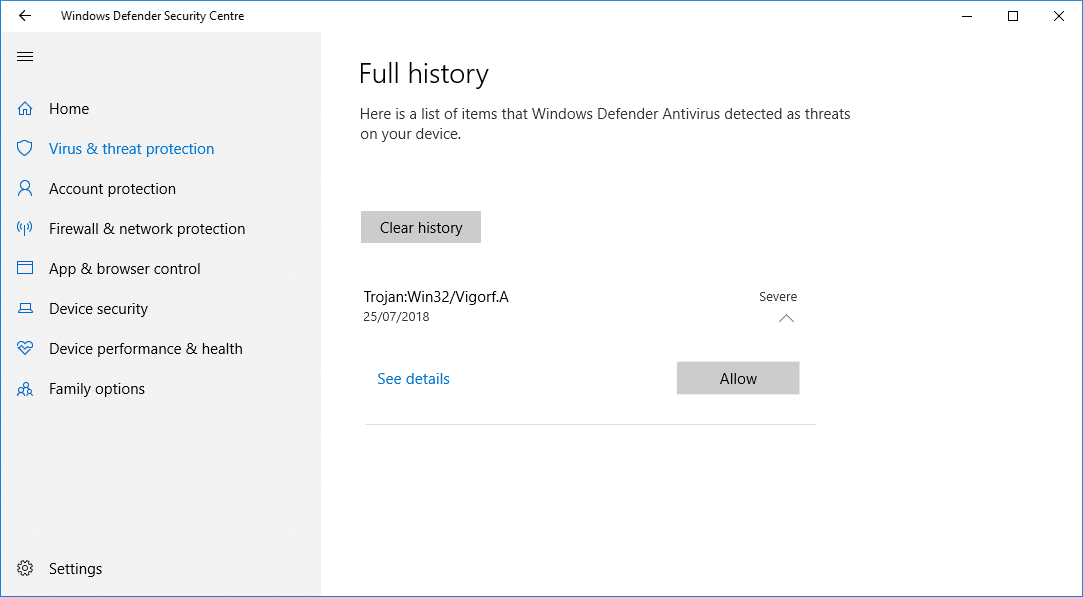
Open the Windows Defender Security Centre and go to the “Virus & threat protection” tab. Then click on “Threat History” and go to “See full history”. After downloading the latest release of Ccminer, you might see something like the above.
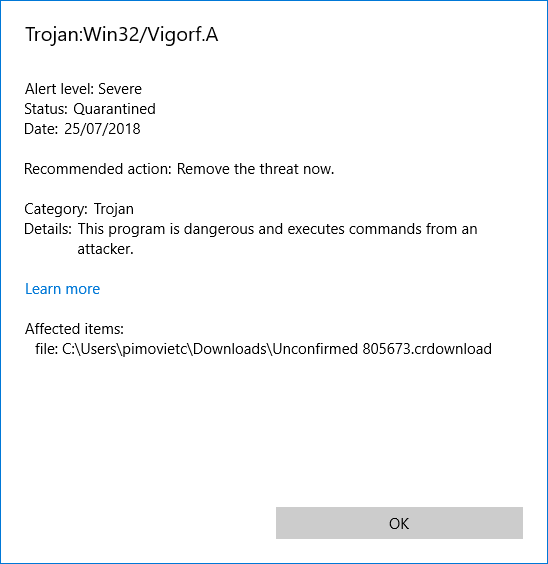
We will want to make sure that we’re allowing the correct file through our Anti-Virus, so it might be useful to clear your history and have it open so see which “threat” gets added. You can also inspect the details of the latest threat, and you should see something similar as above. After pressing ALLOW, you can resume your download from your browser (I’ve used chrome in this case), and the file won’t get removed.
If you try to unzip it, you’ll once again be warned by your Anti-Virus that there is a virus. Go back to the history, check the details and you should find the following. You can then RESTORE the file, and you’re good to go.
Step 2A.2 - Setting up the actual miner, bat files and such
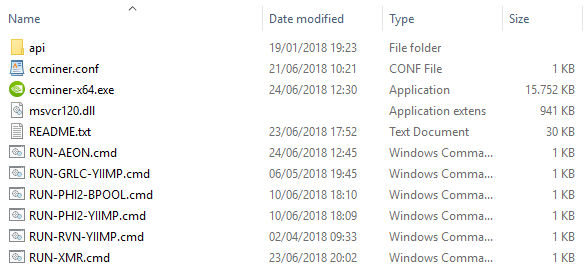
After extraction (and restoring the .exe file), your Miner’s folder should look like this. We won’t be using the RUN-SOMETHING.cmd files which come with Ccminer, so we can throw them away.
Open your favorite text editor (we’ll use Notepad), and paste the following without quotation marks:
“ccminer-x64 -a lyra2v2 -o stratum+tcp://lyra2.easymine.online:5000 -u YOUR_VTC_ADDRESS.WORKER_NAME -p x”
for example
“ccminer-x64 -a lyra2v2 -o stratum+tcp://lyra2.easymine.online:5000 -u VgT29UCrpQyJphre4LztiU1qf1cAaA4RNG.donate -p x”
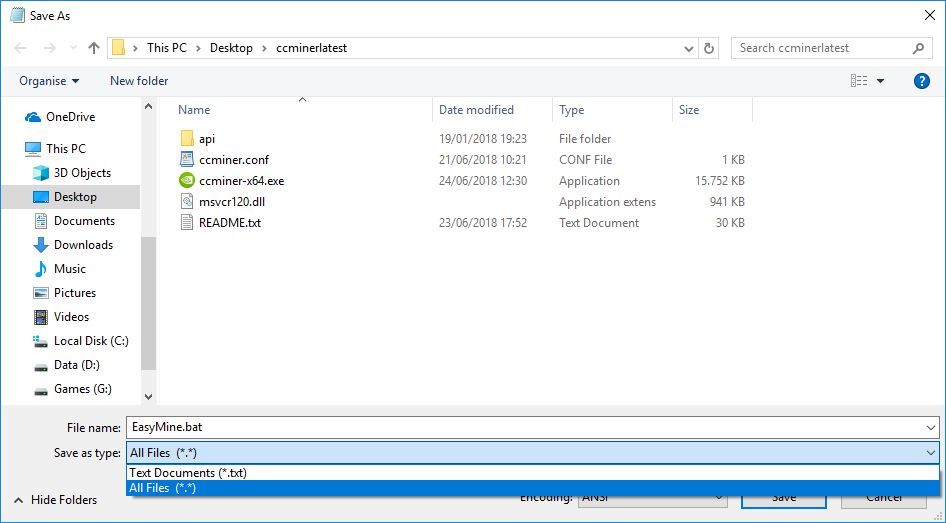
Then press Save As, give it a fancy name like EasyMine.bat (the extension is important!), and don’t forget to switch the Save as Type to All Files.
If you want to, you can omit the worker name and only use your VTC address (note - do not use the . if you’re not using a worker name!)
Alternatively you can generate your BAT file over here.
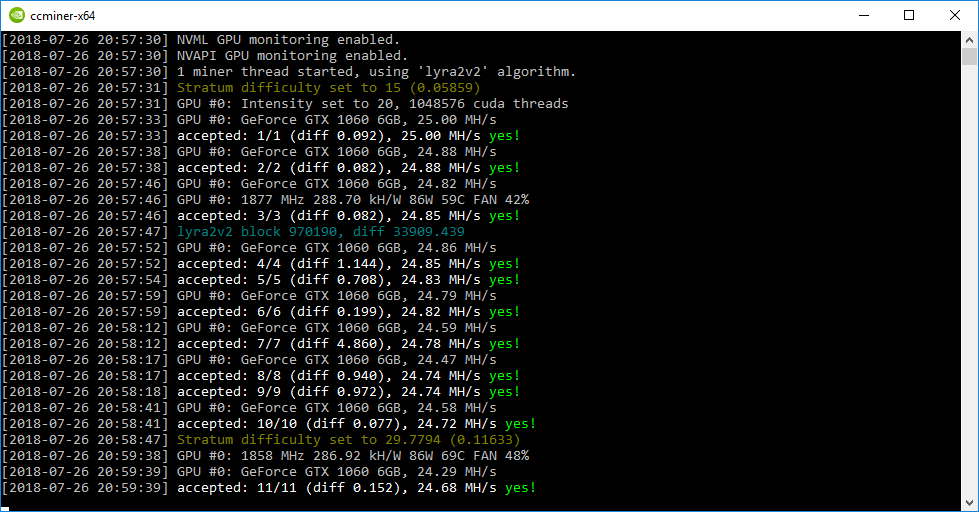
Step 2A.3 - Running your miner - Congrats!

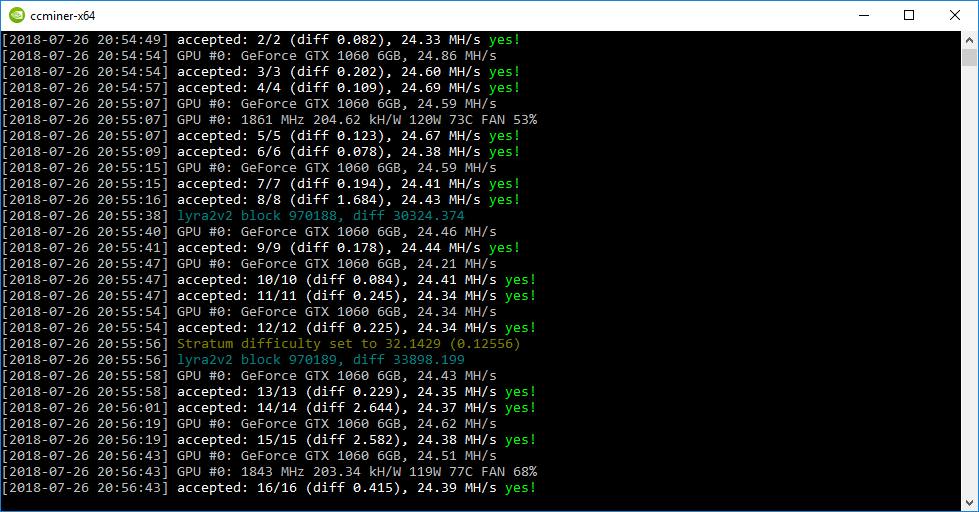
You can now launch your miner by double clicking on EasyMine.bat (the extension might be hidden!). If everything is working correctly, you should start seeing shares being accepted.
Lastly, you’d want to verify if everything is working by going to https://vertcoin.easymine.online/miner/YOUR_ADDRESS
for example: https://vertcoin.easymine.online/miner/VgT29UCrpQyJphre4LztiU1qf1cAaA4RNG
After a while, you should be able to see some shares trickling in. These will eventually result in a payment to your Wallet!
If you see shares on your miner’s page, then you’re officially mining Vertcoin, congratulations! You can now go to Step 3 to link your Unitus wallet to your Miner. If you don’t, you’ll still be mining both VTC and UIS. The UIS will be stored in your pending rewards until you either add a wallet or become inactive for too long.
Step 2B - CCminer for Nvidia - v2.2.5
This section will use the latest CCminer release that doesn’t get falsely flagged as a virus. You can find this release on the tpruvot/ccminer github or you can directly find it here: https://github.com/tpruvot/ccminer/releases/tag/2.2.5-tpruvot.
Step 2B.1 - Setting up the actual miner, bat files and such
After extraction (and restoring the .exe file), your Miner’s folder should look like this. We won’t be using the RUN-SOMETHING.cmd files which come with CCminer, so we can throw them away. So don’t worry if you see more or less RUN-SOMETHING.cmd files.
Open your favorite text editor (we’ll use Notepad), and paste the following without quotation marks:
“ccminer-x64 -a lyra2v2 -o stratum+tcp://lyra2.easymine.online:5000 -u YOUR_VTC_ADDRESS.WORKER_NAME -p x”
for example
“ccminer-x64 -a lyra2v2 -o stratum+tcp://lyra2.easymine.online:5000 -u VgT29UCrpQyJphre4LztiU1qf1cAaA4RNG.donate -p x”
Then press Save As, give it a fancy name like EasyMine.bat (the extension is important!), and don’t forget to switch the Save as Type to All Files.
If you want to, you can omit the worker name and only use your VTC address (note - do not use the . if you’re not using a worker name!)
Alternatively you can generate your BAT file over here.
Step 2B.2 - Running your miner - Congrats!
You can now launch your miner by double clicking on EasyMine.bat (the extension might be hidden!). If everything is working correctly, you should start seeing shares being accepted.
Lastly, you’d want to verify if everything is working by going to https://vertcoin.easymine.online/miner/YOUR_ADDRESS
for example: https://vertcoin.easymine.online/miner/VgT29UCrpQyJphre4LztiU1qf1cAaA4RNG
After a while, you should be able to see some shares trickling in. These will eventually result in a payment to your Wallet!
If you see shares on your miner’s page, then you’re officially mining Vertcoin, congratulations! You can now go to Step 3 to link your Unitus wallet to your Miner. If you don’t, you’ll still be mining both VTC and UIS. The UIS will be stored in your pending rewards until you either add a wallet or become inactive for too long.
Back to topNext up - we want to add our UIS wallet to our EasyMine page to enable payouts for UIS! We’ll be needing the Unitus address, the Vertcoin Wallet and our EasyMine miner’s page. This guide explains the process from the Vertcoin Core Wallet. The process is similar for the other wallets. However, some things might look different.
If you’re using a Ledger as your VertCoin wallet, the signing process is a bit different. You’ll want to skim through the “normal” guide, and then read Step 3A for Ledger specifics.
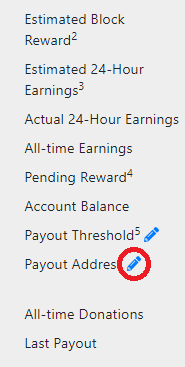
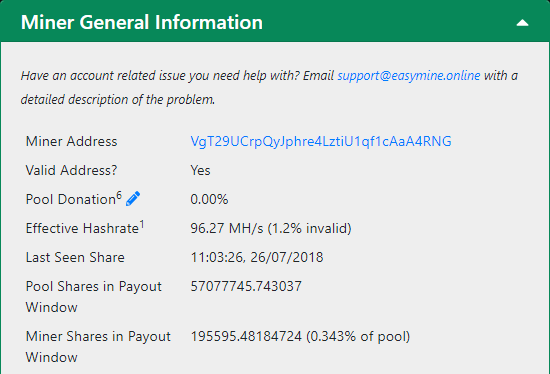
Under “Miner General Information”, locate the blue pencil next to “Payout Address”. This will take you directly to https://vertcoin.easymine.online/settings/YOUR_ADDRESS, which is where you can change your account settings, including your UIS payout address.
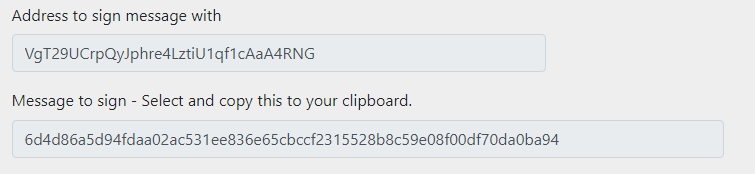
Each time you visit this page, it will show you a (newly generated) message that you need to sign with your wallet. Note that it also tells you that you MUST sign it from your miner’s address. This is important because most wallets will automatically generate new addresses (which are all linked together), and you have to pay attention that you’re using the correct one!
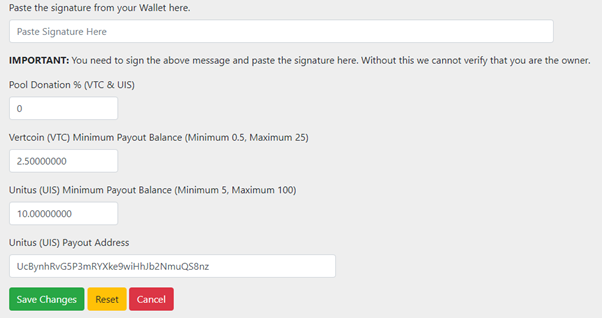
At the bottom of the page, you’ll find all the settings you can change. In the very last field, you want to paste your UIS address. Before pressing “Save Changes”, we’ll first have to sign the actual message that we mentioned earlier.
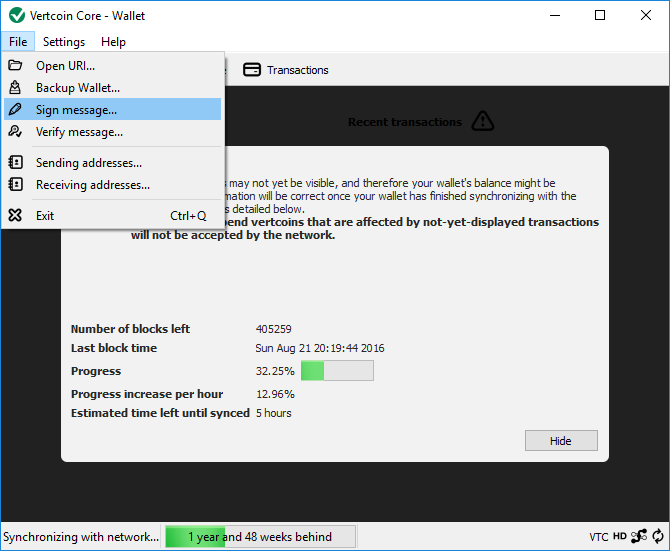
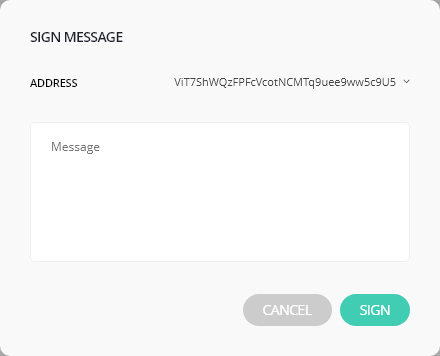
This is where we need to switch back to the Vertcoin Core Wallet and navigate to “Sign message”
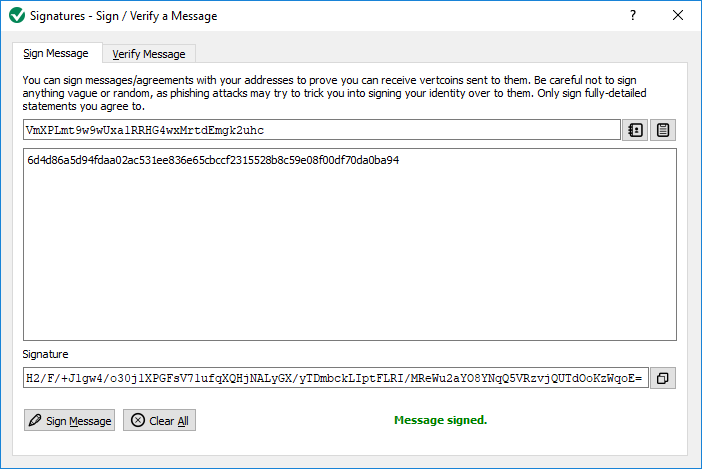
Choose or paste the correct address in the first field, and paste the message in the second. After pressing “Sign Message”, a signature will be generated at the bottom. You’ll need to copy this string and paste it in the correct field on the “Change Account Settings” page and hit “Save Changes”.
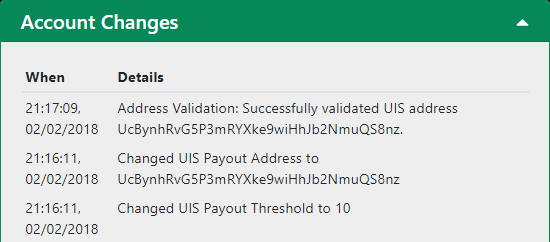
After a while, you should be able to see the changes take effect on your Miner’s Page. It will take some time before your UIS address is validated. However, once it is you’ll start receiving UIS payouts!
Congratulations! You’ve successfully set up your miner, VTC and UIS wallets!
Step 3A - Ledger specific steps
When mining directly to a Ledger wallet, the process of signing messages is a tiny bit different. The main idea is of course very similar, but the Ledger generates a larger message padded with some reiterated data which must be removed.
Also a side note - If you’re mining directly to the Ledger, please use a high payout threshold. This will make it so you only receive a single payout per day and will help alleviate the amount of traffic that Ledger has to process!
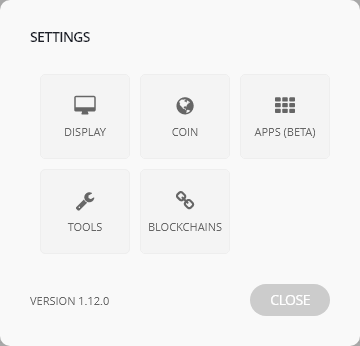
After opening your VTC wallet on your Ledger, navigate to Settings and open Tools.
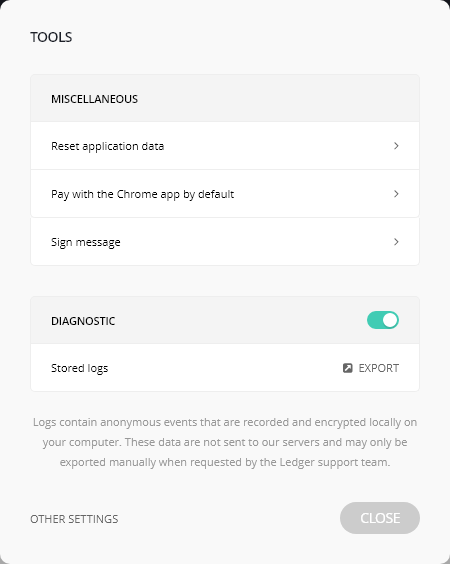
From this menu, go to “Sign message”
Now, in this step it is very IMPORTANT to select the correct address from the dropdown menu. Then copy the message from your EasyMine miner’s page and press Sign.
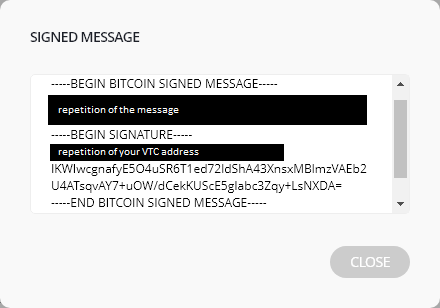
After a short moment, you’ll be presented with the signed message. You’ll see some headers to increase readability and some repetitions of the original message and your wallet’s address. However, on EasyMine we’re only interested in the actual signature, which is the part left readable in the above image. So IKWIwcg…LsNXDA=.
Back to topThere are many ways of overclocking your GPUs. If you’re on a windows system, one of the easiest methods of safely overclocking is with the help of MSI Afterburner. This tool allows you to change your GPU settings within a (relatively very) safe range and monitor temperatures as you go.
Each and every GPU will behave different. There are several guides for your GPUs architecture, type and even specific brands. However, note that two Asus GTX 1060 DUAL 3GB may still behave very differently even though they are the “same” card. Usually, large differences only occur in the same type of cards if different memory types were used. However, it is still possible that two EXACTLY the same specced cards behave different. So keep this in the back of your head when you’re OCing your rig!
Your goal when overclocking may differ based on your electricity cost. If you have a very low price then it might be in your best interest to increase your hashrate as much as possible. If not, you’ll want to strike a balance between power consumption and hashrate.
Step 4A - Setting up MSI Afterburner
You’ll want to download the latest version of Afterburner from MSI, which you can find over here. This tool will allow you to make changes to the core frequency, memory frequency and power limits. (You can change more, but we’ll try to keep the guide short and concise).
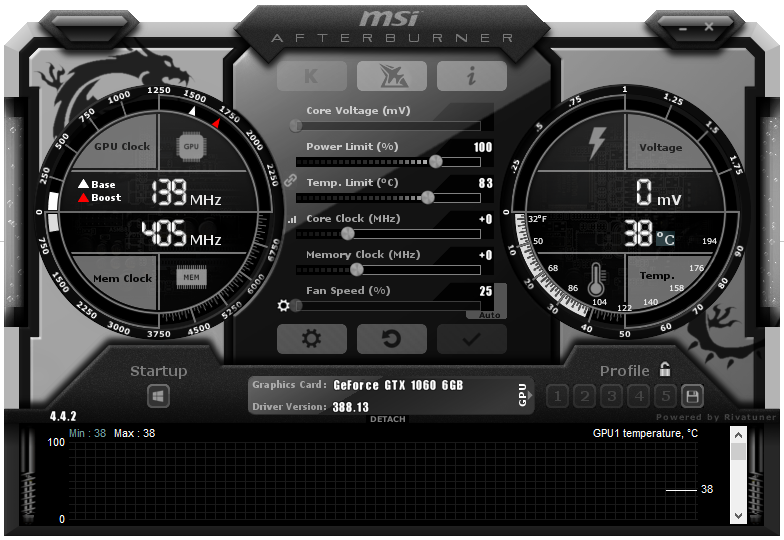
When you first launch Afterburner, it will look something like this. In the center you see some sliders. The top slider (Core Voltage) is usually grayed out by default, and for this tutorial, we’re not going to use it anyway.
The remaining sliders should be rather clear what they do. The Power and Temperature Limits, well they are the maximum power/temp the card may draw/reach until the software will step in and reduce the OC. The Core and Memory clock are the respective clock frequencies it will try to use when on full load.
This means that if you’ve put in a too high OC, then your GPU will start to throttle itself because it either goes above your set Power or Temperature limit. So if you see your frequencies jumping all over the place in the left circle when mining, then you either have to increase your limits or decrease your overclocks.
Step 4B - Settings for Lyra2rev2
For every mining algorithm, the hardware requirements are different and thus benefit differently from different OC settings. As there are a lot of factors that are out of our control that affect the effectiveness of certain settings, we can only give rules of thumb.
Lyra2rev2 (the algorithm used for VTC) is very heavy on the core side and very light on the memory side. Therefore, it is in your interest to increase the core clock frequency by as much as possible and the memory clock not so much. I personally tend to decrease the Power Limit to 70% to decrease the power draw, making my rigs more efficient (more hashes/Watt).
In my experience, my hashrate isn’t affected by dropping the memory clock by a couple of 100 MHz. So decrease the memory clock. This slightly decreases the power draw, thus making it possible to increase the core clock by a little bit more. How to balance this is something you’ll have to test by small increments (during an extensive period) to see what works best for your setup. It is important to work in small steps, as your system might crash when taking large steps at once.
Default OC
PL 70%, Core +150 and Mem -500
Note that the hashrate is marginally higher than with default settings. However, we’re also consuming 30% less energy. Saving on the electricity cost, heat production and wear/tear of the GPU. So this is a win-win situation. Same revenue, less costs what else is there to wish for?

PL 70%, Core +150 and default Memory
It might surprise you that the hashrate drops with a higher memory clock (default is higher than -500). The reason for this is that the GPU used in this example is hitting the Power level because the memory isn’t underclocked. Therefore, it throttles itself. As this differs for each and every GPU you want to do some extensive testing yourself. But as a rule of thumb for Lyra2re2, you want to increase the core clock and decrease the memory clock. Good luck tuning your system!
Back to top